What is Headless WordPress?
Using headless WordPress offers a contemporary method for developing websites. It divides the backend (content management) from the frontend (presentation). Conventionally, WordPress handles both content and presentation. In a headless configuration, WordPress solely manages the content. The frontend is built using other technologies, like React.
Decoupling the Frontend and Backend
Decoupling involves splitting the frontend from the backend. In a headless CMS, WordPress manages the content, while a separate frontend framework displays it. This approach offers more flexibility in choosing how content is presented.
Differences Between Traditional and Headless WordPress
In traditional WordPress, the frontend and backend are tightly linked. Themes and plugins manage both content and appearance. In headless WordPress, the backend handles content management only. The frontend can be developed using contemporary frameworks like React, Vue, or Angular. This separation allows for more creative and dynamic designs.
Advantages of Headless WordPress
Improved Performance and Scalability
Headless WordPress can boost website performance. By using a separate frontend framework, you can optimize how content loads and displays. React, for instance, allows for faster rendering and smoother user interactions. This results in a better user experience.
Scalability is also enhanced. Traditional WordPress sites can struggle with high traffic. Headless setups can handle more visitors without compromising speed. The frontend and backend can be scaled separately. This simplifies managing large amounts of content and numerous users.
Enhanced Security
Security is a significant issue for any website. Headless WordPress can improve security by reducing potential attack surfaces. Since the frontend and backend are separate, direct access to the backend is limited. This makes it more difficult for attackers to exploit vulnerabilities.
Additionally, you can implement stricter security measures on the backend. The frontend can use secure APIs to fetch data, further protecting the content.
Better Developer Experience
Developers enjoy more freedom with headless WordPress. They can select the most suitable tools and frameworks for the frontend. This flexibility enables more innovative and tailored designs.
Working with a headless CMS also encourages modern development practices. Developers can implement version control, automated testing, and continuous integration. These practices lead to more reliable and maintainable code.
Developers can also create reusable components. For instance, a React component for displaying posts can be reused on multiple pages. This reduces development time and ensures consistency.
In summary, headless WordPress offers many benefits over traditional setups. It improves performance, enhances security, and provides a better developer experience. Decoupling the frontend and backend allows for building more dynamic and scalable websites.
Headless CMS vs Decoupled CMS
A headless CMS WordPress React setup focuses on separating the backend and frontend entirely. Unlike decoupled systems, headless CMS doesn’t dictate how content is rendered. It delivers content via APIs, giving you full control over the frontend. For contemporary apps where speed and adaptability are essential, this strategy is perfect.
Overview of React
React is a widely-used JavaScript library. It is employed in the development of user interfaces, particularly for one-page apps. React was created by Facebook and is currently maintained by a sizable community. It’s known for its efficiency, flexibility, and strong performance.
What is React?
React concentrates on an application’s view layer. It enables programmers to design UI elements that are reusable. These parts can be combined to create intricate interfaces and are capable of maintaining their own state.
Key Features of React
React has several key features that make it powerful. Here are a few important ones:
- Component-Based Architecture: React divides the UI into small, reusable components. Each component is self-contained, making development and maintenance easier.
- Virtual DOM: React optimizes updates by utilizing a virtual DOM. First, the virtual DOM is modified. Then, React updates only the necessary parts of the actual DOM. Rendering becomes quicker and more effective as a result.
- Declarative Syntax: Declarative syntax in React makes code easier to debug and more predictable. The UI design is specified by developers, and React takes care of the updates.
Error Handling and Best Practices
API calls can fail. Use proper error handling in your headless WordPress with React setup. Show user-friendly messages during downtime or API issues. Implement retries and log errors for debugging. A smooth error-handling strategy ensures a reliable user experience.
Interactive Features
Add dynamic features like user authentication or a commenting system in your React headless WordPress project. For e-commerce, enhance functionality with secure checkout systems using headless WooCommerce React. These features make your app more engaging and functional.
Why Use React with Headless WordPress?
React is a great choice for headless WordPress. Here’s why:
Efficiency and Flexibility
React’s component-based structure enhances efficiency. Developers can build isolated components that are easy to test and reuse. This modularity leads to faster development and fewer bugs.
React is also highly flexible. It can be used for various parts of the application, from simple UI elements to complex interactions. Due to its adaptability, developers can customize the frontend to meet specific requirements.
Seamless Integration with WordPress REST API
The WordPress REST API makes it easy to fetch content. React can interact with this API to retrieve and display WordPress content. This integration is seamless and efficient.
Enhanced User Experience and Interactivity
Making dynamic, interactive user interfaces is where React shines. It can handle real-time updates and user interactions smoothly. This capability enhances the user experience significantly.
Frontity Framework
Frontity is a React framework specifically designed for WordPress. It simplifies the process of building headless WordPress sites with React. Frontity handles most configurations out of the box.
Zero Setup
Frontity requires minimal setup. It comes pre-configured for optimal performance. Developers can start building without worrying about initial configurations. This makes it accessible even for beginners.
Server-Side Rendering (SSR)
Frontity inherently supports server-side rendering. Server-side rendering (SSR) enhances SEO and speeds up initial load times. Pages are rendered on the server before being sent to the client. This leads to quicker initial page loads and enhanced search engine indexing.
Flexible Architecture
Frontity’s architecture is highly flexible. It easily integrates with existing WordPress setups. You can use it alongside your current themes and plugins. Its flexibility makes it ideal for incremental adoption.
Using Frontity
- Install Frontity: Use npm to install Frontity. Run npx frontity create my-project to create a new project.
- Choose a Theme: Frontity provides a variety of themes to choose from. Pick one that fits your project’s requirements.
- Connect to WordPress: Set up your Frontity project to link with your WordPress site. Update the frontity.settings.js file with your WordPress site URL.
Advantages of Frontity
- Performance: Pre-configured for optimal performance out of the box.
- SEO Friendly: Built-in support for server-side rendering.
- Developer Experience: Simplifies the setup process, allowing developers to focus on building.
Frontity can significantly reduce development time. It seamlessly integrates with WordPress, making it perfect for developers who want to use React’s capabilities with minimal configuration.
Alternative Frameworks and Tools
Frameworks like as Next.js offer server-side rendering (SSR) and static site generation (SSG) features, notwithstanding React’s versatility. These features improve SEO and performance for your React headless WordPress application. Consider tools like Gatsby for advanced optimizations.
SEO and Metadata Handling
SEO is crucial for any site. Use tools like react-helmet or Next.js <Head> for managing meta tags in a WordPress headless React setup. Improve search engine exposure by dynamically updating information in response to API responses.
Setting Up a Headless WordPress with React
To install React on a headless WordPress website, take the following actions:
Getting Started with WordPress as a Headless CMS
Install and Configure WordPress
- Choose a Hosting Provider: Choose a trustworthy web host for your WordPress website. 24×7 WP Support, SiteGround, WP Engine, and Bluehost are a few well-liked choices.
- Install WordPress: Installing WordPress requires following the hosting provider’s guidelines. The majority of suppliers give a one-click installation method.
- Set Up Your Site: Complete the initial setup by choosing a site title, username, and password. Right now, your WordPress website is simple.
Set Up the WordPress REST API
- Enable the REST API: WordPress comes with the REST API activated by default. You can access it by appending /wp-json to your site’s URL (e.g., https://yoursite.com/wp-json).
- Install Useful Plugins: Some plugins enhance the REST API. Consider installing plugins like “WP REST API Controller” to manage endpoints and permissions.
- Configure API Settings: Check the settings of your installed plugins. Ensure they are configured to expose the necessary data.
Advanced API Management Strategies
Working with huge datasets in a headless WordPress React configuration requires careful API management. Use pagination to manage massive material collections effectively, cutting down on server load and load times. Caching techniques, such as browser caching or Redis, can reduce the number of unnecessary API requests, which will accelerate the delivery of content. In order to combat abuse and make sure your API is still responsive even during periods of high traffic, think about introducing rate limitations. These procedures may be streamlined with tools like Apollo for GraphQL or sophisticated REST API setups, guaranteeing that your headless WordPress React website operates at peak efficiency.
GraphQL Integration
GraphQL is a powerful alternative to REST APIs. It allows more efficient data querying. Instead of fetching complete objects, GraphQL fetches only required data. This optimization can significantly improve your application’s performance.
While REST API is powerful, integrating GraphQL can simplify data fetching for React headless WordPress projects. By just retrieving the data you require, tools such as WPGraphQL help you save bandwidth and boost efficiency. GraphQL with Apollo Client may be used to easily query WordPress data. For example, it becomes easy and efficient to get posts with authors and categories. Compared to REST API, this contemporary method offers more flexibility.
Setting Up WPGraphQL
- Install WPGraphQL Plugin: Access your WordPress admin panel. Navigate to Plugins > Add New. Look for “WPGraphQL”. Install and activate it.
- Configure the GraphQL Schema: After installation, configure your GraphQL schema. This involves defining types and queries. The WPGraphQL plugin provides an intuitive interface for this.
- Test Queries with WPGraphiQL: WPGraphiQL is an IDE for testing GraphQL queries. It offers a visual interface that makes testing easier. You can execute queries and see responses instantly.
Benefits of GraphQL
- Efficient Data Fetching: Retrieve only the necessary data to reduce transfer size and enhance performance.
- Single Endpoint: Unlike REST, GraphQL operates through a single endpoint. This simplifies your API architecture.
- Strong Typing: GraphQL schemas are strongly typed. This reduces errors and improves developer experience.
Integrating GraphQL into your headless WordPress setup can enhance performance and developer productivity. Fetching only the required data helps prevent over-fetching and under-fetching issues typical of REST APIs.
Detailed Benefits and Use Cases
A WordPress headless React site offers improved performance, scalability, and cross-platform compatibility. Use cases include creating dynamic e-commerce platforms with headless WooCommerce React or delivering content to mobile apps and IoT devices. It’s a robust solution for businesses seeking seamless user experiences.
Security Enhancements
Security is crucial for any web application. A headless WordPress setup is no exception. Implementing proper security measures protects your data and users.
Implementing Advanced Security Measures
Any web project must prioritize security, but headless WordPress React setups require extra care. Consider employing a web application firewall (WAF) in addition to more basic defenses to fend against frequent dangers like SQL injection and cross-site scripting. Extra levels of security are provided by cloud-based security services like Cloudflare, which include SSL encryption and DDoS mitigation. You may further protect your system by using multi-factor authentication. (MFA) for backend access and doing regular security audits. By setting up automatic security updates, you can make sure your headless WordPress React website is always safe from the newest exploits.
Authentication
Authentication guarantees that your API may only be accessed by authorized users. Use OAuth or JWT (JSON Web Tokens) for safe authentication.
- Install JWT Authentication Plugin: In WordPress, go to Plugins > Add New. Find “JWT Authentication for WP REST API” by searching. After installing, turn on the plugin.
- Configure JWT: Follow the plugin documentation to configure JWT. This usually involves setting up secret keys.
- Use Tokens in React: Send JWT tokens with your API requests. Users are authenticated, and endpoints are secured.
HTTPS
Whenever you encrypt data, utilize HTTPS. Data exchanged between the client and server is safeguarded by it.
- Obtain an SSL Certificate: Purchase an SSL certificate from a reputable vendor. Some hosting providers offer free certificates.
- Configure HTTPS: Follow your hosting provider’s instructions to enable HTTPS. Ensure all your API endpoints use HTTPS.
API Rate Limiting
Rate limiting prevents abuse of your API. It limits the quantity of requests a user is able to submit at one time.
- Install Rate Limiting Plugin: Search for a suitable rate limiting plugin in WordPress. Install and activate it.
- Configure Limits: Set appropriate rate limits based on your application’s needs. This could be a number of requests per minute or hour.
Regular Updates
Keep WordPress, plugins, and your React app updated. Regular updates patch vulnerabilities and improve security.
- Enable Auto-Updates: Enable automatic updates for WordPress and its plugins.
- Monitor Updates: Regularly check for updates to your React dependencies. Update them promptly to maintain security.
Implementing these security enhancements protects your application. They guarantee that sensitive data can only be accessed by authorized individuals. Using HTTPS encrypts data, keeping it safe from eavesdropping. Regular updates keep your application secure from known vulnerabilities.
Headless WordPress Plugins and Tools
It’s crucial to use the appropriate tools and plugins. They improve the security and usefulness of your headless WordPress configuration.
WPGraphQL
WordPress now has a GraphQL API thanks to WPGraphQL. It makes data querying more effective.
- Install WPGraphQL: Go to Plugins > Add New in WordPress. Look up “WPGraphQL”. After installing, turn on the plugin.
- Configure GraphQL Schema: Define types and queries to match your data needs.
ACF to REST API
This plugin exposes Advanced Custom Fields (ACF) via the REST API. It allows easy access to custom field data.
- Install ACF to REST API: Navigate to Plugins > Add New. Search for “ACF to REST API”. Install and activate the plugin.
- Enable API Access: Ensure custom fields are set to be exposed in the REST API.
JWT Authentication
JWT Authentication secures your API endpoints. It guarantees data access for only authorized users.
- Install JWT Authentication: Search for “JWT Authentication for WP REST API” in Plugins > Add New. Install and activate the plugin.
- Configure JWT: Follow the plugin’s setup guide to configure authentication.
Benefits of Using These Tools
- Efficiency: WPGraphQL enables efficient data queries.
- Flexibility: ACF to REST API allows for complex data structures.
- Security: JWT Authentication ensures secure access to your API.
Using these plugins and tools enhances your headless WordPress setup. They provide efficient data handling, flexibility, and robust security.
Setting Up the React Frontend
Set Up a New React Project
- Install Node.js and npm: Ensure you have Node.js and npm installed. They are available for download on the official website.
- Create a React App: To create a new project, use Create React App. Open your terminal and run:

- Navigate to Your Project: Move into your project directory:

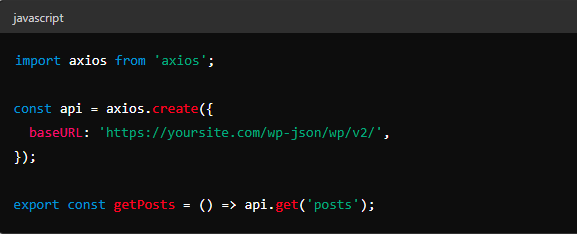
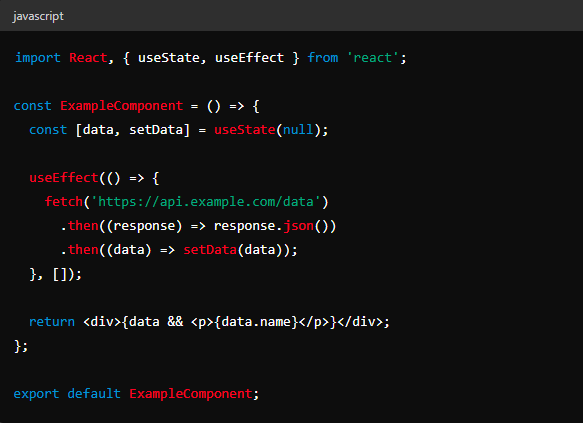
Connect React to WordPress REST API
- Install Axios: Axios is a popular library for making HTTP requests. Install it by running:

- Fetch Data from WordPress: Create a new file (e.g., ‘js’) in your ‘src’ folder. Use Axios to fetch data:
Fetch and Display Data from WordPress
- Create a Posts Component: Create a new file (e.g., ‘Posts.js’) in your ‘src’ folder. Use it to fetch and display posts:
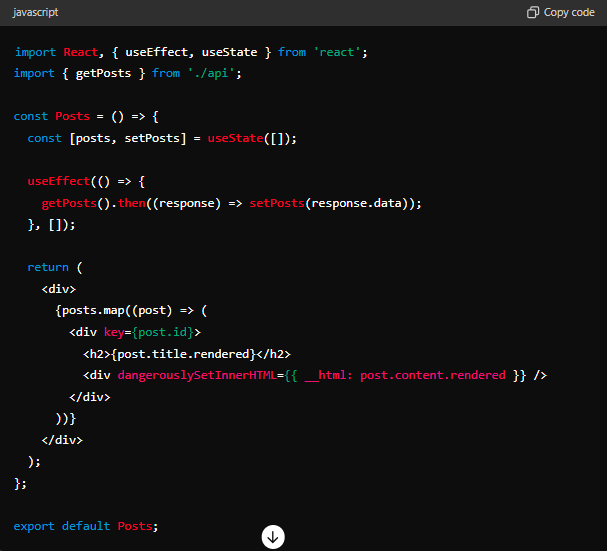
- Display the Posts Component: Import and use the ‘Posts’ component in your main ‘js’ file:
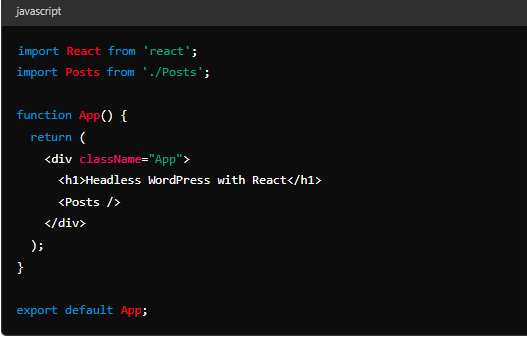
3. Start the React Application: Run your React app by executing:

This process will launch your React application. It will pull content from your WordPress website and show it.
Performance Optimization Techniques
Performance optimization is crucial for user satisfaction. Faster load times enhance user engagement. There are several techniques to optimize performance in a headless WordPress and React setup.
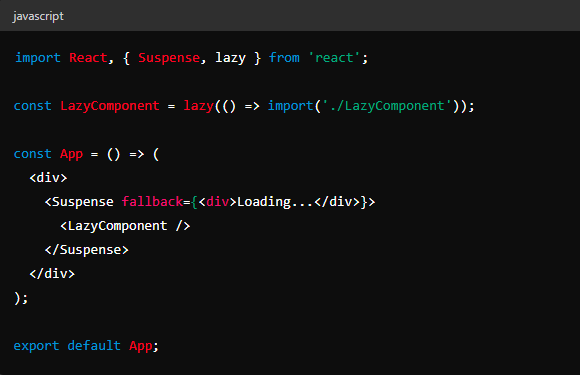
Code Splitting
Code splitting breaks your code into smaller chunks. Load these chunks on demand. This reduces the initial load time, making your app faster. Use React’s built-in support for code splitting with React.lazy and Suspense.
Lazy Loading
Lazy loading postpones the loading of non-critical resources. This applies to images, videos, and components. Load these resources only when they are needed. Implement lazy loading in React using React.lazy for components and loading=”lazy” for images.
Caching
Caching saves data locally, minimizing server requests. Implement client-side caching with service workers or libraries like SWR. This speeds up data retrieval and improves performance.
Image Optimization
Optimized images load faster and use less bandwidth. Compress images before uploading them to WordPress. Utilize responsive images to deliver various sizes according to device capabilities.
Tips for Optimization
- Minimize HTTP Requests: Minimize the number of requests sent to the server.
- Enable Gzip Compression: Compress resources to decrease file sizes.
- Use a Content Delivery Network (CDN): Spread content across different locations to minimize load times.
- Optimize JavaScript and CSS: Minify and combine files to reduce their size.
By using these strategies, you can greatly enhance the functionality of your software. Faster load times enhance user experience and can improve search engine rankings.
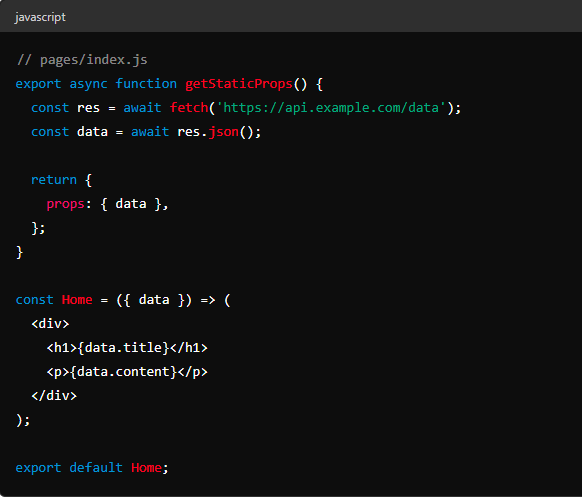
Static Site Generation (SSG)
SSG, or static site generation, improves SEO and performance. At build time, static HTML pages are generated. After then, users receive these pages without any server-side processing.
Using Next.js for SSG
Next.js is a popular framework for React. It supports SSG out of the box.
- Install Next.js: Run ‘npm install next react react-dom’ in your React project.
- Create Next.js Pages: Create a pages directory in your project. Add files for each page you want to generate.
- Fetch Data at Build Time: To retrieve data at build time, use ‘getStaticProps’. This function feeds the page with data while it is running in the build process.
Deploying Next.js
Deploy your static site to platforms like Vercel or Netlify. These platforms optimize static site hosting.
- Deploy to Vercel: Push your project to GitHub. Connect your repository to Vercel. Vercel will automatically build and deploy your site.
- Deploy to Netlify: Similarly, connect your repository to Netlify. It will take care of the deployment and build procedures.
Benefits of SSG
- Performance: Static pages load faster. They don’t need processing on the server side.
- SEO: Static pages are easily indexed by search engines. This improves your site’s SEO.
- Scalability: Serving static files reduces server load. This makes your site more scalable.
Using SSG with Next.js can greatly enhance your application. It combines React’s flexibility with the performance advantages of static sites. Deploying to platforms like Vercel or Netlify further optimizes performance and scalability.
Server-Side Rendering (SSR)
SSR (Server-Side Rendering) improves initial load speed and SEO. After rendering pages on the server, SSR delivers the client fully rendered HTML. This method offers a quick and engaging user experience.
Using Next.js for SSR
Next.js is ideal for implementing SSR with React. It simplifies server-side rendering while maintaining flexibility.
- Install Next.js: Run npm install next react react-dom in your project directory.
- Set Up Pages: Make a directory called pages. Add files for each page you want to render server-side.
- Fetch Data Server-Side: To retrieve data at the moment of request, use ‘getServerSideProps’. With every request, the server performs this function.
Deploying Next.js with SSR
Deploy your SSR application to platforms like Vercel or AWS. These platforms support server-side rendering efficiently.
- Deploy to Vercel: Push your project to GitHub. Connect your repository to Vercel. Vercel will automatically build, deploy, and handle server-side rendering.
- Deploy to AWS: Set up an AWS Lambda function to handle server-side rendering. Use AWS Amplify to manage the deployment process.
Benefits of SSR
- SEO Improvement: Search engines can index fully rendered pages. This boosts your SEO performance.
- Faster Initial Load: Users receive fully rendered pages quickly. This improves the perceived load time.
- Dynamic Content: SSR allows for dynamic content fetching. Pages can be updated with fresh data on each request.
SSR with Next.js combines the advantages of server-side and client-side rendering. It ensures fast, SEO-friendly pages with dynamic content capabilities.
Benefits in Real-World Scenarios
- Flexibility: Allows for creative and dynamic front-end designs.
- Performance: Provides fast load times and smooth user experiences.
- Content Management: Simplifies content updates and management.
- Scalability: Handles large amounts of content and traffic efficiently.
These examples showcase the practical benefits of headless WordPress and React. They highlight how this setup enhances flexibility, performance, and content management.
Real-World Examples
Imagine building a product catalog with headless WooCommerce React, where WordPress serves as the backend and React powers the frontend. Another example is a blog with dynamic filtering and user interactivity, leveraging headless CMS WordPress React for fast and fluid experiences.
Advanced Customizations
Custom post types and fields may be used to improve your headless WordPress with React configuration. Plugins like ACF allow you to define unique fields for custom data. Expose these fields via the REST API or GraphQL for use in your React app. This customization ensures your site meets specific project needs.
Benefits of Using React with Headless WordPress
Using React with headless WordPress offers several benefits:
Enhanced Performance
React’s virtual DOM makes rendering quick and easy.
Better performance and quicker page loads are the outcomes of this. Users experience quicker interactions and smoother navigation.
Improved SEO
Traditional single-page applications can struggle with SEO. However, with server-side rendering (SSR) or static site generation (SSG), React can improve SEO. You may accomplish this and improve the search engine friendliness of your website with the aid of Next.js.
Better Developer Experience
React’s ecosystem provides many tools and libraries. Developers can use these to streamline development and improve productivity. Features like hot reloading, extensive documentation, and a large community are major advantages.
Tools for Enhancing Collaboration in Headless WordPress Projects
Effective collaboration is key in large headless WordPress React projects. Use version control systems like Git to manage code changes and ensure everyone on your team is on the same page. Implement continuous integration and continuous deployment (CI/CD) pipelines with tools like Jenkins or GitHub Actions to automate testing and deployment, reducing errors and saving time. Docker can help create consistent development environments, making it easier for teams to work together. Project management tools like JIRA or Trello keep tasks organized, ensuring your headless WordPress React project runs smoothly from start to finish.
Scalability
React applications are highly scalable. You can build small components and gradually expand them. The capacity to scale means that your application can expand to meet your needs.
Building a Sample Application
Building a sample application will help you understand the integration of WordPress and React. Here, we’ll create custom post types, fetch data, and handle routing.
Creating Custom Post Types in WordPress
How to Create Custom Post Types
- Install Custom Post Type UI Plugin: Open the WordPress administration panel. Navigate to Plugins > Add New. Search for “Custom Post Type UI” and install it.
- Configure Custom Post Type: After activation, go to CPT UI > Add/Edit Post Types. Fill in the necessary fields like Post Type Slug (e.g., ‘movies’) and Plural Label (e.g., ‘Movies’).
- Add Custom Fields: Install the “Advanced Custom Fields” plugin. Navigate to Custom Fields > Add New. Create fields like Director, Release Date, etc.
Advanced Custom Fields (ACF) Integration
Advanced Custom Fields (ACF) enhances the flexibility of WordPress. It allows adding custom fields to your posts and pages. These fields help structure content more effectively.
Setting Up ACF
- Install ACF Plugin: Access your WordPress dashboard. Go to Plugins > Add New. Search for “Advanced Custom Fields”. Install and activate it.
- Create Custom Fields: After installation, create custom fields for your content. These fields can be text, images, links, and more. Customize them according to your content needs.
- Show Fields in REST API: Enable the “Show in REST API” option to make custom fields accessible via the REST API, allowing you to fetch this data in your React application.
Benefits of ACF Integration
- Enhanced Content Management: Structure your content with various custom fields. This adds more control over content presentation.
- Flexible Data Handling: Easily fetch custom field data in your React app. This integration simplifies complex data structures.
- Improved User Experience: Better-organized content leads to a more user-friendly interface.
Integrating ACF with your headless WordPress setup improves content management. Custom fields allow for more detailed and structured content. This flexibility enhances both the backend and frontend experiences.
Managing Content with Custom Post Types
- Add New Entries: Go to your custom post type (e.g., Movies) in the WordPress admin menu. To add new entries, click “Add New”.
- Use Custom Fields: Fill in the custom fields you created. This adds structured data to your custom posts.
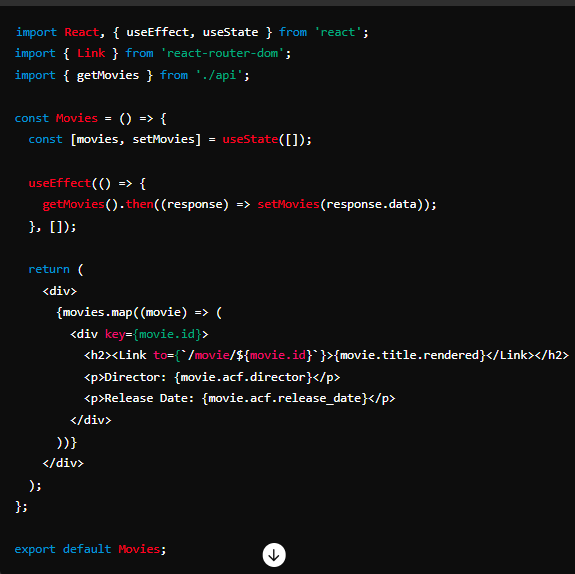
Fetching Data in React
Making API Calls in React
- Update API Configuration: Modify your “api.js” file to fetch custom post types:

- Create a Movies Component: Create a new file (e.g., “js”) in your ‘src’ folder:
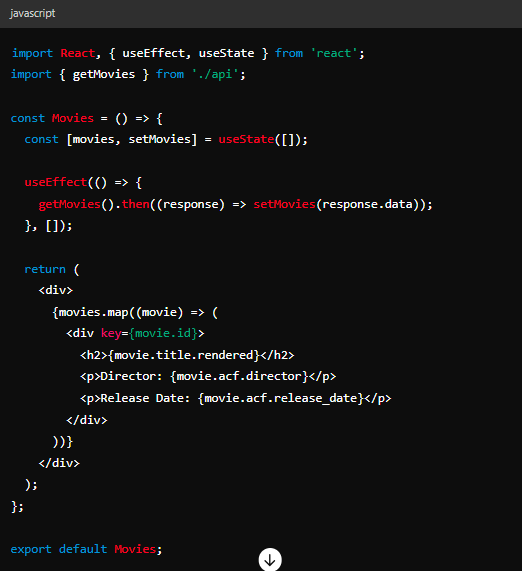
Displaying Content from WordPress in React Components
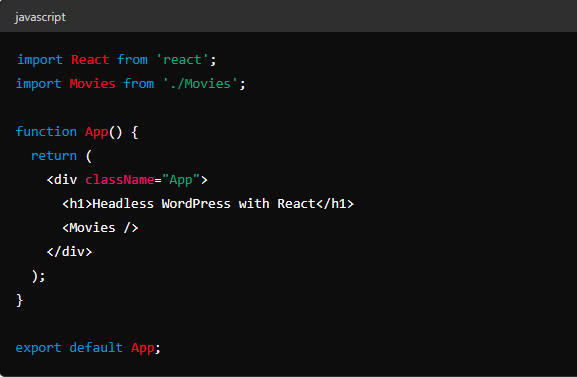
- Import the Movies Component: Open your ‘App.js’ file and import the ‘Movies’ component:
- Run the React Application: Execute the command to start your React app:

Your app should now display the custom post types from WordPress.
Handling Routes and Navigation
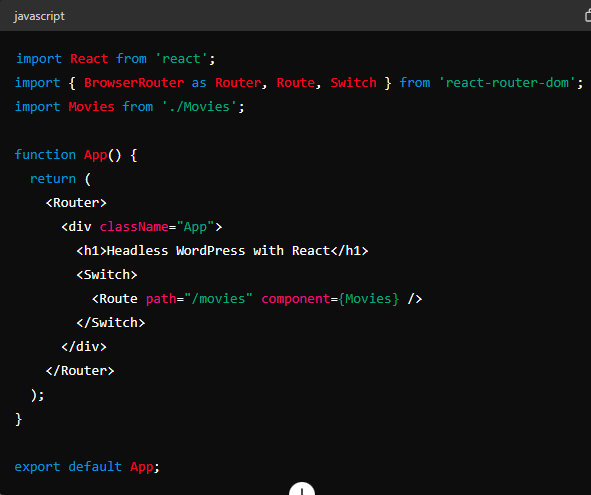
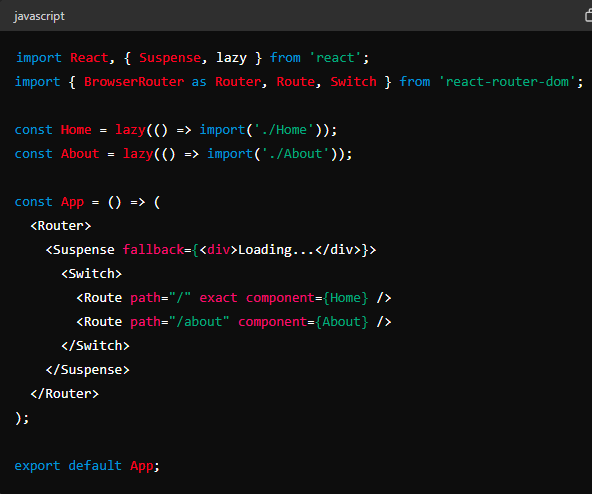
Setting Up React Router
- Install React Router: Install React Router by running:

- Configure Routes: Update ‘App.js’ to include routes:
Creating Dynamic Routes for WordPress Content
- Create a Movie Detail Component: Create a new file (e.g., ‘MovieDetail.js’) in your ‘src’ folder:
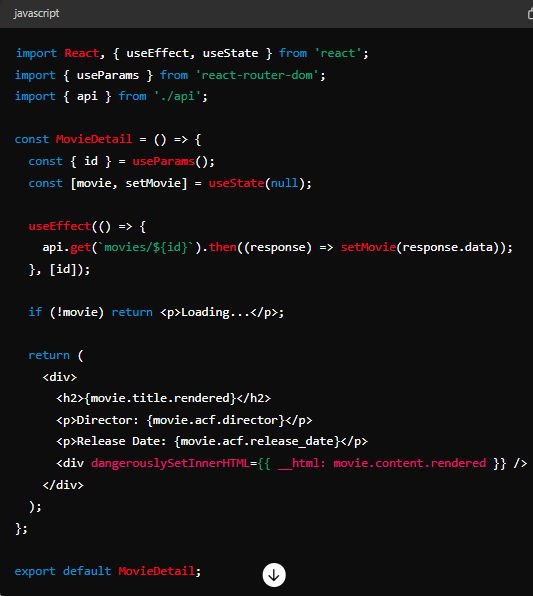
- Update Routes: Modify ‘js’ to include the dynamic route:
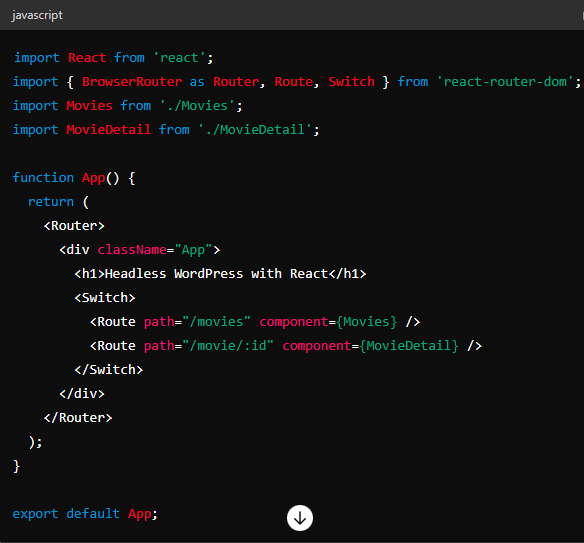
3. Link to Movie Details: Update the ‘Movies’ component to link to individual movie details:
Enhancing Your Headless WordPress Site
To enhance your headless WordPress site, focus on advanced React features, performance optimization, and SEO considerations. This process will improve functionality, speed, and search engine rankings.
Using Advanced Features of React
State Management with Redux or Context API
- Install Redux or Use Context API: Choose Redux for complex state management or Context API for simpler cases. Install Redux by running:

- Set Up Redux Store: Create a ‘store.js’ file and configure the Redux store:
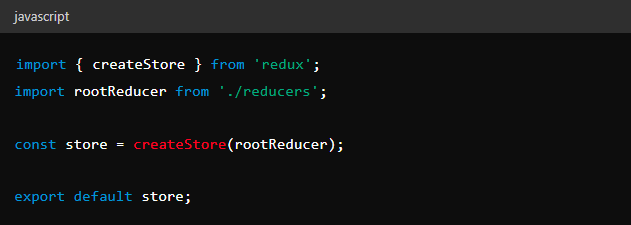
- Provide Store to App: Wrap your ‘js’ with the ‘Provider’ component:

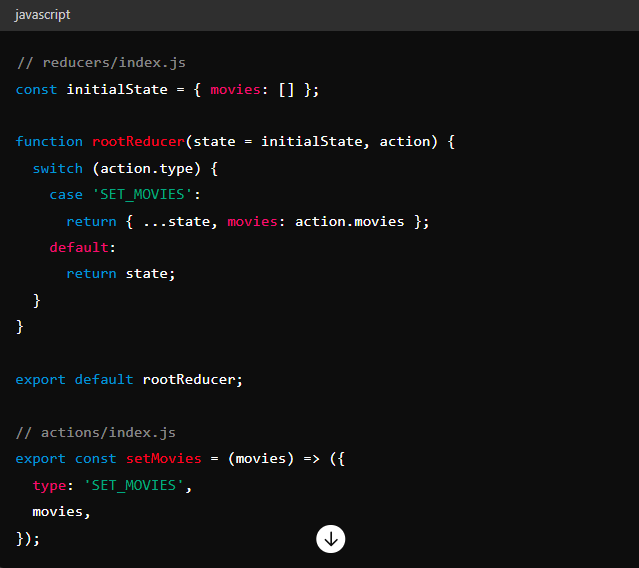
- Create Reducers and Actions: Define your reducers and actions to manage state:
Implementing Hooks for Better Functionality
- Use State and Effect Hooks: Utilize React’s built-in hooks for managing state and side effects:
Optimizing Performance
Lazy Loading and Code Splitting
- Install React Lazy and Suspense: React provides built-in support for lazy loading and code splitting:
- Split Code at Routes: Use React Router’s lazy loading capabilities to split code at route level:
Optimizing Images and Media
- Use Next-Gen Image Formats: Convert photos to WebP or other next-generation formats. Tools like ImageMagick can help:

- Optimize Image Sizes: Resize images to the appropriate dimensions using tools like Sharp:

3. Lazy Load Images: Use the ‘loading=”lazy“’ attribute on ‘<img>’ tags:

SEO Considerations
SEO Best Practices for Headless CMS
- Use Server-Side Rendering (SSR): Tools like Next.js enable SSR for better SEO:

- Generate Static Pages: Use Static Site Generation (SSG) for pages that don’t change often:
Using Plugins and Tools for SEO in Headless WordPress
- Install SEO Plugins: Use plugins like Yoast SEO in WordPress to optimize content:

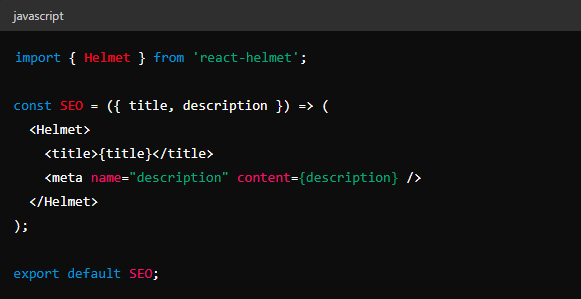
- Add Metadata in React: Use the ‘react-helmet’ library to manage metadata:

3. Configure Metadata: Update your components to include SEO metadata:
Overcoming SEO Challenges in Headless WordPress
In a headless WordPress React configuration, SEO might be challenging, but it’s not impossible. Making sure search engines appropriately index your information is one difficulty. Increased content exposure for search engines may be achieved by utilizing server-side rendering (SSR) with frameworks such as Next.js. Furthermore, even in a headless system, think about utilizing programs like Yoast SEO with customized settings that adjust to your decoupled arrangement. To make your material easier for search engines to comprehend and rank well, use structured data and make XML sitemaps.
Integrating WooCommerce with React
Integrating WooCommerce with React allows you to create a dynamic e-commerce site. This section covers setting up WooCommerce in headless WordPress, building a React frontend for WooCommerce, and managing orders and checkout.
Setting Up WooCommerce in Headless WordPress
Install and Configure WooCommerce
- Install WooCommerce Plugin: Go to your WordPress admin panel. Navigate to Plugins > Add New. Search for “WooCommerce” and install it.
- Activate WooCommerce: After installation, activate the plugin. To specify basic parameters like as currencies, payment methods, and shipping options, simply follow the setup tutorial.
- Add Products: Navigate to Products > Add New. Enter the product’s name, description, cost, and pictures. Publish the product.
Set Up WooCommerce REST API
Enable REST API: Go to WooCommerce > Settings > Advanced > REST API. Click on “Add Key”. Give it a description, select a user, and grant “Read/Write” permissions.
- Click on “Generate API Key”.
- Store API Keys: Note the Consumer Key and Consumer Secret. These keys are what you’ll need to authenticate API requests.
- Test API Endpoint: Confirm the API is working by accessing an endpoint. For example, visit https://yoursite.com/wp-json/wc/v3/products in your browser. You should see a JSON response with product data.
Building a React Frontend for WooCommerce
Set Up a New React Project
- Create React App: To create a new project, use Create React App. Run:

- Navigate to Project Directory: Move into the project directory:

Fetch WooCommerce Products and Data
- Install Axios: Install Axios for making HTTP requests:

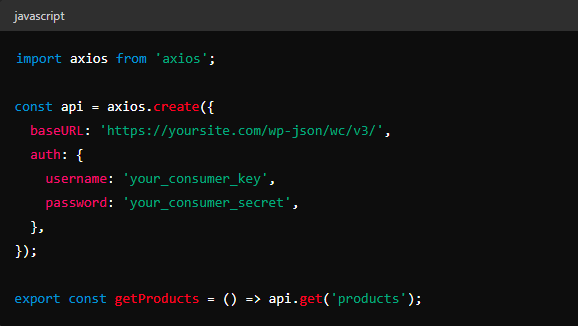
- Create API Utility: Create an ‘js’ file in your ‘src’ folder:
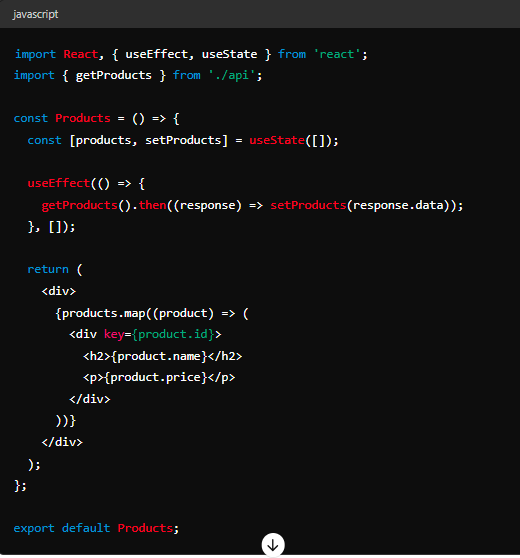
3. Fetch Products in Component: Create a ‘Products.js’ file in your ‘src’ folder:
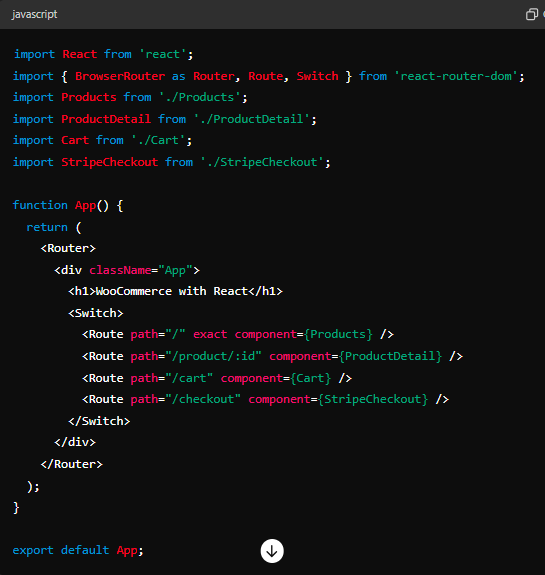
Create Product Pages and Shopping Cart Functionality
- Set Up Routing: Install React Router:

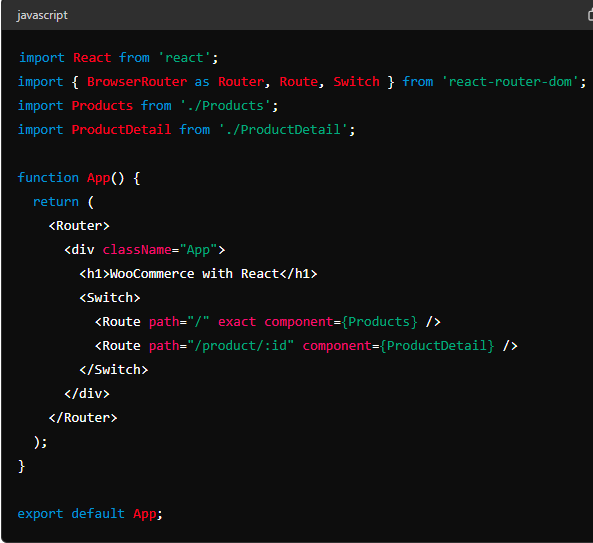
- Configure Routes: Update ‘App.js’ to include routes:
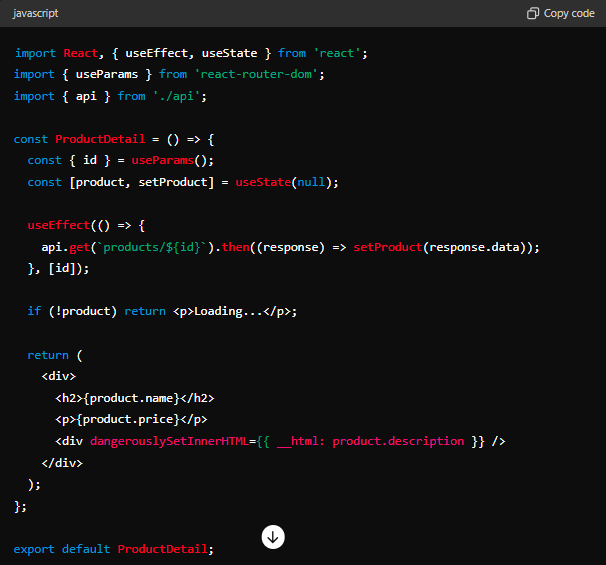
- Create Product Detail Component: Create a ‘ProductDetail.js’ file:
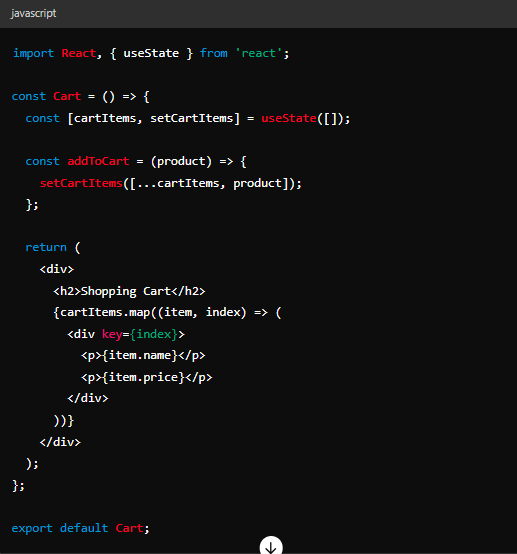
- Create Shopping Cart Component: Create a ‘js’ file to manage the shopping cart:
Managing Orders and Checkout
Integrate Payment Gateways
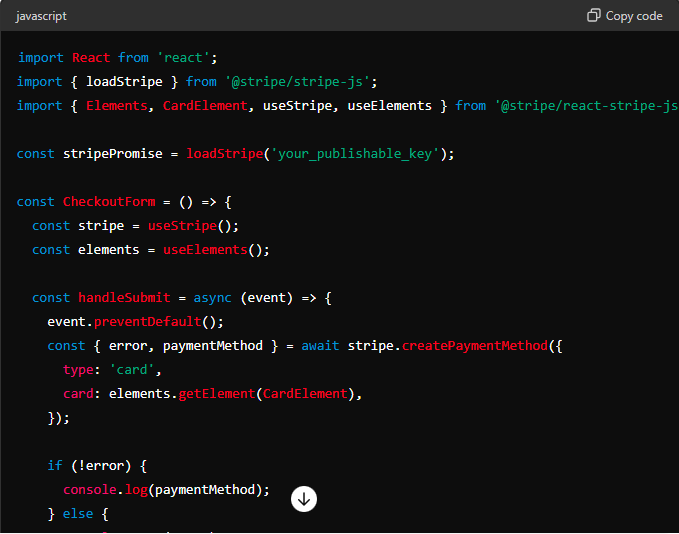
- Set Up Stripe: Install Stripe’s React library:

- Configure Stripe: Create a ‘StripeCheckout.js’ file:
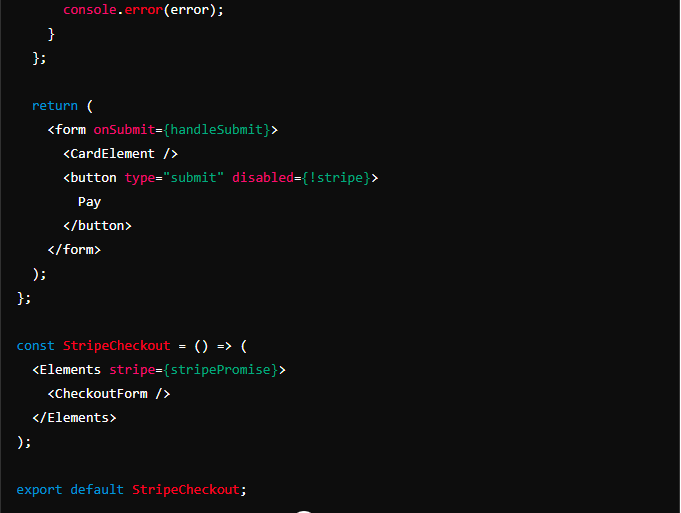
- Include Checkout in App: Update ‘js’ to include the Stripe checkout component:
Handling Order Processing in React
- Create Order API: Add a new endpoint to handle orders in your WordPress backend. You may need a custom plugin for this.
- Send Order Data from React: Modify your Stripe checkout form to send order details to your custom endpoint.
Deployment and Hosting Considerations
For deployment, platforms like Kinsta, Vercel, or Cloudways provide optimized hosting for headless WordPress with React. Use serverless architecture for the frontend and caching mechanisms for APIs. Ensure your WordPress backend is secure and performant to deliver consistent experiences.
Case Studies: Successful Implementations of Headless WordPress with React
The power of headless WordPress React integrations is demonstrated by real-world applications. This strategy, for example, was utilized by a major e-commerce site to improve site scalability and performance, which improved user experiences and increased conversion rates. Another example is a news website that used headless WordPress React to manage large amounts of traffic and smooth changes to dynamic content. These illustrations show how this configuration may be altered to satisfy certain project requirements while maintaining performance.
Conclusion
Integrating WordPress as a headless CMS with React offers many benefits. It allows for flexible content management and dynamic front-end development. This combination improves performance, enhances security, and provides a better user experience.
Using advanced React features like state management and hooks adds functionality. Fast load times are ensured by performance optimization techniques including code splitting and lazy loading. SEO considerations help improve search engine rankings.
The integration process, including setting up WooCommerce, demonstrates the potential of headless WordPress. Fetching data, creating custom post types, and managing routes make the site more interactive. Building a shopping cart and handling payments with Stripe enhance the e-commerce experience.
By following the outlined steps, developers can create a robust, scalable website. This approach suits various needs, from blogs to complex online stores. The flexibility and power of React combined with WordPress’s CMS capabilities offer a winning solution.
Overall, adopting headless WordPress with React provides a modern, efficient way to build websites. It leverages the strengths of both platforms, resulting in high-performance, engaging web applications. Developers can enjoy a better workflow and users get an improved experience. For individuals who want to keep ahead of the curve in web development, this configuration is perfect.